Filter Holders for the Nikon 14-24 f/2.8
Before Lee Filters came up with their SW150 I was already using ND Grad filters on the Nikon 14-24 f2.8 with a Cokin X-Pro filter holder with the X499 Universal Adapter Ring. The results were not so good, it was difficult to position and align the filter holder with the lens and the all set-up suffered from light reflections with light leaking from the sides and from behind. I actually gave up on the all thing, until recently i.e…
As far as I know there are 3 filter systems that can be used with the 14-24 f2.8: the Lee Filters SW150 [which I had my hands on]; the Hitech Lucroit [which I never seen] and the my ‘improved’ Cokin X-Pro. The SW150 uses Lee’s 150x170mm [2mm thick] filters while the Lucroit which uses Hitech’s own 165x200mm filters. Cokin’s X-Pro System on the other hand uses 130x170mm [3mm thick] filters from either Cokin or Lee. While the Lee SW150 system is designed specifically for the Nikon 14-24 the Hitech Lucroit is more versatile and can be used in a number of lenses with built-in scalloped hoods and on normal lenses with filter threads. The Cokin X-pro system is close to the Hitech in terms of versatility if used with the X499 Universal Adapter. All 3 systems can be used with lenses with filter threaded lenses through adapters available from the manufacturers. How solid is the attachment to the 14-24? Well, the Lee SW150 is pretty solid, my ‘improved’ Cokin X-Pro is ok and the Hitech Lucroit I can not comment since I never had my hands on it.
Cost wise, in the US the Lee SW150 seems better value [$367US], especially if one deducts the cost of the 0.6ND Grad Hard [a $120US value] that comes with the SW150 kit. The Cokin X499 Universal Adapter is ridiculously overpriced at $212 bucks! while the Hitech Lucroit [with 14-24 adapter] is $350US. In Europe the situation is a bit different, the SW150 is £324 [£231.60 if one deducts the 0.6ND Grad H that comes with, i.e. $385US or 296EUR], the Hitech Lucroit is £249 with adapter [app. $414US or 318EUR] while the Cokin X-Pro holder with X499 adapter is £111 [i.e. $184US or 141EUR]. Yes, the X499 adapter costs here £64.95 [app. $108US or 83EUR] basically half than in the US. I got the prices and exchange rates from: US: BHPhotovideo [Lee, Hitech, Cokin]; Europe: RobertWhite [Lee], Amazon UK [Cokin], Formatt [Hitech]; Oanda [Exc. Rates 7-Oct-2012]. All in all the Cokin X-Pro option is quite an attractive alternative, if it would work properly with the 14-24 i.e.
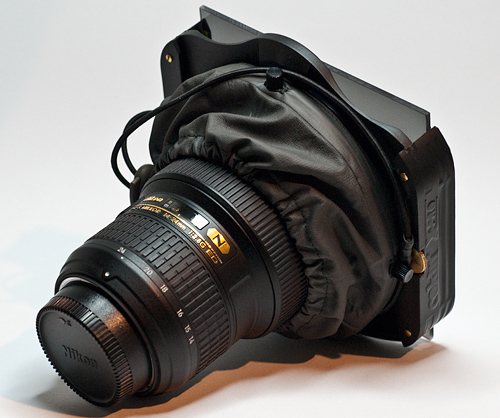
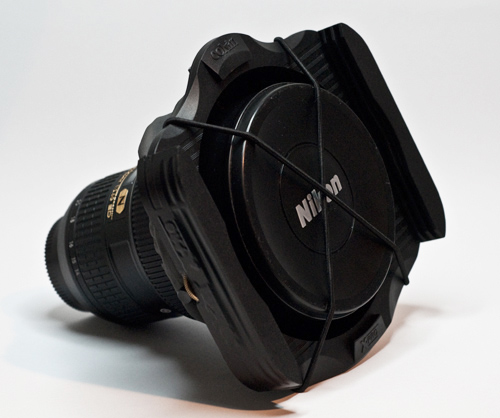
This is how my ‘improved’ version looks like:
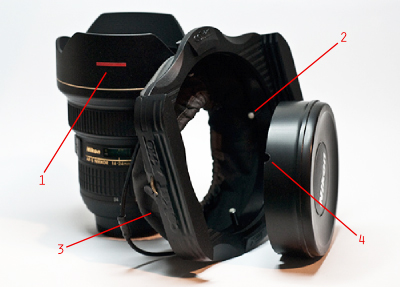
Looks nice, no? The changes are few and easily done with a Dremel tool and a sewing machine [Kudos to Iris for the excellent job done]:
1-The positioning marks on the lens barrel are only necessary when you want to use both filter slots [the Cokin X-Pro has 2 filter slots], it is not needed if you use only 1 filter [which I recommend, more on this later].
2-Cut the screws that come with the x499 adapter so that when the screws are fully tighten the filter holder is centered and properly secured on the lens hood. After shortening the screws I added a drop of epoxy to the end so that it does not scratch the lens barrel. I adjusted the length of the screws so that without the epoxy drop [just in case the epoxy drops get detached] the filter holder can still be attached securely to the lens hood with the screws fully tighten.
3-Made a light baffle from an old ultralight goretex jacket. It attaches to the x499 adapter ring through button holes where the screws are and has a bungee on the other end. The button holes location is such that it they do not hinder the rotation of the filter holder. It reduces reflections by blocking light coming from behind to reach the filter through the gap between the adapter ring and hood and also reflections from incident light on metal or plastic parts close to the front element of the lens. The length was adjusted so that with the bungee tighten you can still use the manual focus ring. The bungee serves a dual purpose, prevents stray light from coming in and is long enough to crisscross in front and keep the lens slip-on cap in place when moving around.
4-The shallow grooves on the lens slip-on cap are used to position the filter holder quickly and accurately in the field for 1 filter use. The position of the 4 grooves match the 4 screws of the X499 adapter, i.e. 90 degrees apart so that when they are at the end of the groove, the filter holder will be correctly positioned on the lens barrel. You can then remove the cap and slide a filter on the top slot without fear of it touching or scratching on the lens hood. I also placed some electrical tape on the sides of the filter slots to prevent stray light coming in from the sides.
The lens with the filter holder and cap installed and without any filters should look like this:
Does it work? Yes and quite well, there is no vignetting at all at 14mm with 1 filter on the top slot and problems with reflections are less. Still, when using the lens at the widest focal lengths one should do a check. The reflections issue gets much worse when using 2 filters. Also, with 2 filters there is a slight vignetting at the widest focal lengths. I opted not to cut the grooves for 2 filters on the slip-on cap [it is though plastic and the cuts would be longer], instead I used red tape marks on the lens barrel for positioning reference but it is still cumbersome to set up the holder at the correct position in the field.
Does it hold? Yes it does. It is not as solid as the Lee SW150 but I had no problems so far, just tighten those screws properly and check them from time to time.
How does it compare with the Lee SW150? Well, if you can afford it go for the Lee system, it was designed specifically for the 14-24mm and it is a better and more robust option overall than this homemade improvement of the Cokin X-Pro holder. If on the other hand you are on a tight budget and have already invested some money on X-Pro sized filters and the filter holder then maybe you will find this post useful. I have no experience with the Hitech Lucroit holder so I can’t comment, but if you do post your experiences. Also, if you came up with better and/or alternative ways of making this homemade X-Pro+ more robust and functional post and/or send me images of your setup, I will add them to the post.
LEE Filters ND Grads: Banding and Discoloration
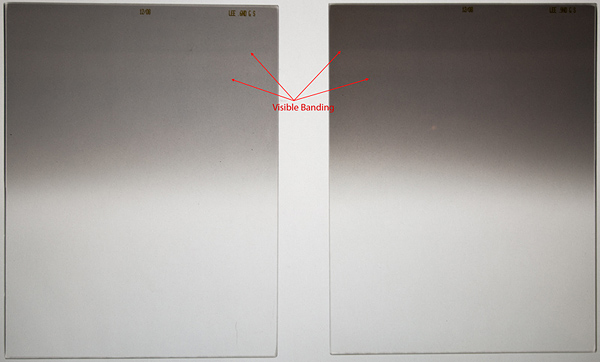
Until recently I always stored my LEE ND Graduated filters in the Lee wraps inside the Lee pouches provided, i.e. until I start noticing some discoloration and banding in them. The discoloration and banding were more pronounced on the 0.9/0.6 ND Grad Soft/Hard filters [both Xpro and standard] and clearly seen with the naked eye.
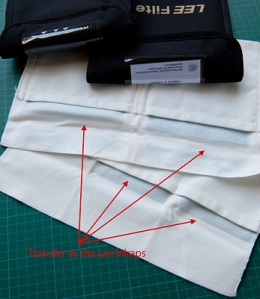
The banding matched the pouch pattern, i.e. the top part of the filter that, only covered by the wrap flap is less affected and the top of the pouch [where the fabric is doubled on itself and stitched] coincides with the banding and in the inside of the pouch there is transfer of the filter material that matches the gradation of the ND Grad. Since I never washed the wraps [maybe I should have] the issue of me introducing aggressive chemicals in the fabric as a result improper washing does not apply in my case [unless of course they were introduced during manufacturing].
I promptly contacted LEE customer service in the UK and they told me to return the filters and wraps to them for inspection, which I did. The end result was that LEE agreed to replace the filters but warning that they should be stored in their pouches [not necessarily in their wraps]. LEE did mention that under certain conditions [which conditions exactly?] the microfibre wraps can have a detrimental effect on the filters and should not be used. The new wraps are different from the old in both design and material but it is not completely clear to me if one can/should keep the filters in them for prolonged storage. I would assume it is but then I assumed it was ok with the old wraps, so…
I have to give a big thumbs up to LEE’s European customer service, they were both very friendly and fast and within 10 working days I received the replacement filters as promised [they even paid for the international shipping].
In conclusion, if you have LEE ND or ND Grad filters stored in the old microfibre wraps inspect them at once and consider replacing the old microfibre wraps by the new ones [which are better] for storage? and field use even if there is no visible damage to the filter(s). If you really must use the old microfibre wraps at least put the ND part of the filter towards the bottom of the pouch. The problem is that most of the on-line shops who stock LEE Filter products have not updated the product images and do not mention if the wraps are the old or the new design, so don’t forget to ask before placing the order.
OWC’s Data Doubler Review
Decided to upgrade my Mac Book Pro 13″ mid-2009 [Unibody 5.5] with some extra memory and Raid storage. OWC’s Data Doubler bracket makes it possible to install a 2nd hard drive where the optical drive is…since I don’t remember the last time I’ve used it…perfecto!
The price of SSDs is still out of this world and it didn’t make sense to me to spend that kind of cash in an upgrade of what is now an ‘old’ Powerbook, so decided on two Western Digital 750Mb Scorpio Black. These are fast drives and my faithful 3.5″ desktop Scorpio Black hasn’t failed me yet [check a comprehensive review at TechReport ].
The problem was to find the stuff on this side of the pond, for about the same price. After googling around for a bit I bumped into a website that pointed me to these guys: Macupgrade. A quick email to check their reaction time and stock, placed the order on-line and got the package 3 days later with everything well packed and in original condition. It was faster and costed less than ordering directly from OWC and these guys have a lot of OWC’s stuff right here, so very convenient indeed.
Back to the Data Doubler, what can I say…it’s a good product, the holes for the screws fit perfectly, no hard edges, the manual is very good with detailed step-by-step instructions for each model and it comes all the tools you need to install the bracket. Since the disk is secured to the bracket by 2 screws, it’s not vibration damped as the main hard disk bay which uses rubber grommets. Of course this is not really a problem for SSD’s but for normal HD’s it might be, especially when there is a lot of vibration around and both disks are in a Raid 0 configuration [also known as sky-diving without a parachute, backup often…]! But so far, so good…
A couple of things that might be useful and that are not mentioned in the installation manual:
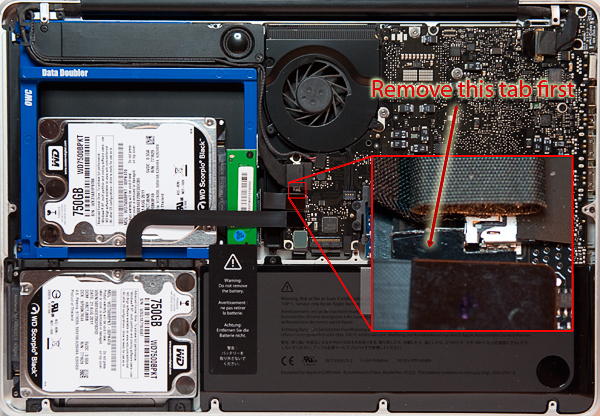
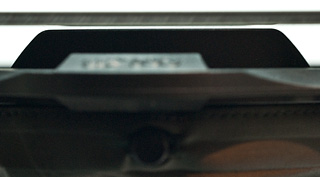
a) Disconnecting the camera cable from the logic board is really a delicate step. There is a small plastic tab glued to the logic board that you should remove first so that it’s easier to disconnect and reconnect the cable later [don’t worry, it is not hard glued and can be placed back afterwards]. It’s located here:
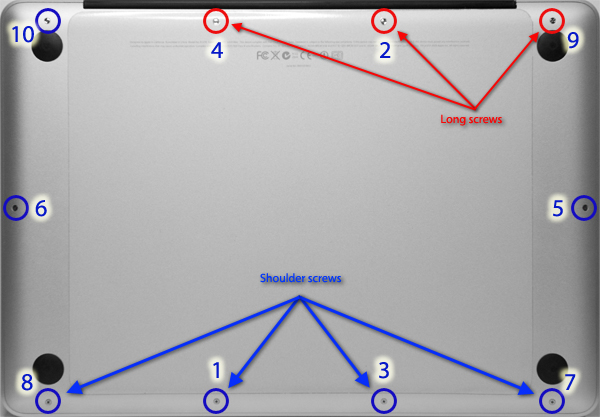
b) The bottom case of the MPB 13″ mid-2009 only has long screws [13.5mm] and 3mm screws but the MBP 13″ mid-2010 has [apparently!] also shoulder screws [also 3mm] which are slight different from the other 3mm screws. Their positions are shown below along with the correct tightening sequence to avoid wobbling.
I cloned my existing hard disk [a Seagate Momentus 7200.4, already slightly better than the 5400rpm stock HD it came with] using the excellent Carbon Copy Cloner shareware, booted from an external USB disk, formatted and partitioned each of HDs alike and using Apple’s Disk Utility created Raid 0 volumes [with 128k block size] from the respective partitions [hint: if Disk Utility says that the 1st raid volume is busy when trying to create the second, unmount the first!]. This is software raid so there is a processing overhead involved, still the overall performance is a lot better. The downside of having 2 HDs is higher power consumption and reduced battery autonomy, worth it in my case.
Xbench performance results:
Disk: Seagate Momentus 7200.4 500Gb Disk: WD Scorpio Black 7200 750Gb Striped Raid Disk Test 44.84 Disk Test 136.74 Sequential 94.15 Sequential 156.40 Uncached Write 110.85 68.06 MB/sec [4K blocks] Uncached Write 346.80 212.93 MB/sec [4K blocks] Uncached Write 156.67 88.65 MB/sec [256K blocks] Uncached Write 316.81 179.25 MB/sec [256K blocks] Uncached Read 60.80 17.79 MB/sec [4K blocks] Uncached Read 58.30 17.06 MB/sec [4K blocks] Uncached Read 94.04 47.26 MB/sec [256K blocks] Uncached Read 419.58 210.88 MB/sec [256K blocks] Random 29.43 Random 121.48 Uncached Write 9.07 0.96 MB/sec [4K blocks] Uncached Write 52.28 5.53 MB/sec [4K blocks] Uncached Write 154.00 49.30 MB/sec [256K blocks] Uncached Write 520.42 166.61 MB/sec [256K blocks] Uncached Read 81.27 0.58 MB/sec [4K blocks] Uncached Read 144.32 1.02 MB/sec [4K blocks] Uncached Read 146.77 27.23 MB/sec [256K blocks] Uncached Read 201.96 37.47 MB/sec [256K blocks] Power (W) from Manufacturer Power (W) from Manufacturer Seek,Typical: 1.554 Read/Write: 1.75x2 Idle, Typical: 0.67 Idle: 0.8x2Update: the good folks at Macupgrade are giving a 10% discount to readers of the blog. Enter the following code before completing your order: macupgradesantos
iPhone Support with Quick Release Plate
It has been a while since my last post.
These days I tend to carry my iPhone around when taking pictures, it’s a very useful thing really. There are a number of interesting apps, many of them free and quite useful for long exposure photography, sooo…instead of fumbling through pockets each time I need it I looked around for some sort of plate/support that could hold it within easy reach of the camera. I did not find anything commercially available that meets my requirements [one came close though] so I decided to make one from bits and pieces of stuff lying around.
Voilà, jorgesantosphotography proudly presents the ‘iPhone Support with Quick Release Plate’…tattaaaa…
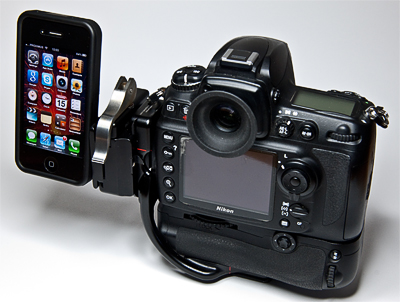
The half-plate comes from a camera plate I don’t use anymore. I cut it in half to reduce weight. The small ballhead comes from a Manfrotto 709B table top tripod and the iPhone case is from Griffin. Of course, you case use a cheaper ballhead and iPhone case. I just had this stuff lying around so…here is how it looks when attached to the camera, as I intended it to be:
Yes, you need a sliding clamp such as the RRS B2-Duo or a Novoflex Q=Mount [better choices then the expensive and bulky FAS Clamp shown]. The small Manfrotto ballhead allows you to position the iPhone as you want [portrait/landscape, whatever] and has enough clamping power to hold it in place even if you are running around with the camera with the iPhone attached. I have been using it for some time and I still have a working iPhone…You can take it apart for packing too, here:
A couple of things, don’t use an iPhone plastic case that has a rubber coating! since the round camera base is glued to the back of the iPhone case with Epoxy it will separate from the case quite easily because it is actually glued to the rubber coating. Also, use some coarse sandpaper on both surfaces [case and round camera base that comes with the ballhead] before applying a thin layer of strong Epoxy. Optionally, you can also put a screw through the cut-off Arca Swiss plate preventing the base of the ballhead from rotating in relation to the plate [red circle]. Put a drop of thread locker glue [Loctite blue for e.g.] in all the threads just in case [like the back of the case to the ballhead if you want, it packs quite nicely even when not taken apart].
Hope you find this DIY project useful in some way, I did at times.
Eyjafjallajökull and Yasur Eruption Galleries
To stack or not to stack Nikon Teleconverters
I never contemplated stacking teleconverters because of the loss in picture quality associated but since I just got the new TC-20EIII…why not do some quick comparison shots? The stacked combo of the TC-20EIII plus the TC-17EII gives you a 3.4x factor meaning that a 70-200 mm f2.8 becomes a 238-680 mm f9.5 on a FX body and a 357-1020 mm f9.5 on a DX Body. On a 200-400 f4 lens the stack gives you a 680-1360 mm f13 on a FX and a 1020-2040 mm f13 on a DX body. Truly impressive focals no? It will cost you a 3.5 stops light loss and AF capability at least.
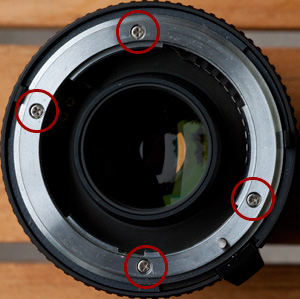
Due to the optical design of the teleconverters the TC-20EIII can be used on top of the TC-17EII [but not the other way around!!] without the optical elements touching but to do this one has to remove an annoying tab in the female bayonet of the TC-17EII first. It is quite a simple procedure though, locate the 4 screws on the female bayonet of the TC-17EII [the side where your lens attaches to the tele], remove the screws and remove the bayonet with care. If you do it properly you won’t even disturb the position of the spring that is under the bayonet [note the position of the spring, just in case!]. There is only 1 correct position for the bayonet because of the lens release pin, it is really that straightforward.
Needless to say that you do it at our own risk!! It will likely void the manufacturer’s warranty and if not done properly can damage the teleconverter. If you feel uncomfortable trying this on your own go to an authorised Nikon repair center and ask them to do it for you. Many UK repair centers will remove the small tab for a small fee.
Locate the small tab that is almost aligned with one of the screws [see pict A below]. Take a smooth flat or half-round needle file and carefully remove material from the tab until it is almost flush with the inner part of the bayonet [see pict B]. To avoid making scratches and cuts on the bayonet surface while using the file, cover the areas next to the tab with electric insulation tape. Remove the tape when finished, place the bayonet back in the teleconverter and tighten the screws [be careful to align the threads properly! don’t force the screw in! if it offers resistance then it either the threads are not properly aligned or the spring under the bayonet is not in the right position!].
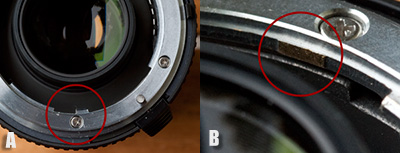
A - The annoying tab that needs to be removed on the lens attachment side of the TC-17EII and B - how it looks after removal if done properly
That’s it! The TC-20EIII can now the stacked on top of the TC-17EII.
Quick Stacking Comparison Tests
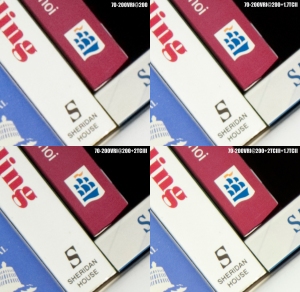
D700, manual exposure 1/80 sec, f/11, ISO 800 with a 70-200 f2.8 VR I at 200mm with VR Off. Shots without any tele, with the 17EII, with the 20EIII and with stacked 20EIII and 17EII combo. Shots taken on a sturdy tripod with remote release and mirror-up. Blow ups of the frames taken without teleconverter, with the 17EII and 20EII were resampled in Photoshop using Bicubic interpolation to match the magnification of the stacked shot. Default Adobe Raw conversion settings [no sharpening applied], no further processing. Click on the thumbnail to download a higher resolution version.
Conclusions?
Although the tests were not extensive they nevertheless show the superior quality of the TC-20EIII. The blow-up of image with the TC-20EIII is actually sharper and more contrasted than the one taken with the TC-17EII alone. Between the images taken with the TC-20EIII and with the Stacked teleconverters, I actually prefer the one with the stacked teles [despite the lower contrast] but Photoshop Bicubic interpolation is not the best interpolation around. If I would resize the TC-20EIII image in ImageMagick with the right filter settings I’m sure that the differences would be minimal or non-existent and I wouldn’t need to lose an extra 1.5 stops and give up AF altogether during shooting. You to decide…
Twin Camera Setups – Really Right Stuff Lego
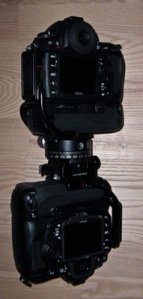
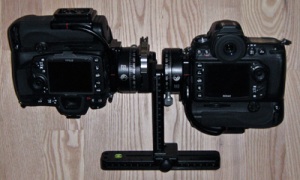
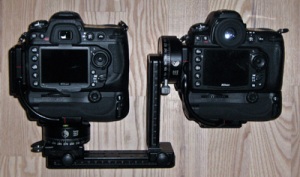
Just been playing around with the possibility of using a twin camera setup for shooting movies and stills simultaneously for both handheld and tripod shots. Using RRS stuff I came up with a couple of interesting configurations for use with wide/medium zoom lenses.
This is an somewhat interesting set-up for handheld. Due to the L plates on each body each camera can be set for landscape or portrait and the yaw [in vertical position] or pitch [in horizontal position] can be adjusted independently. Put a camera strap on the top body and you can carry both around your neck.
The next 2 are meant to be used on a tripod. You can adjust the position on the ballhead to balance the all thing better. Again the L plates allow each body to be set for landscape or portrait in addition to the tripod’s head movements.
The problem is that for tripod shooting both configurations [1 more than the other] will amplify any vibration issues so…still I though it was interesting in case you want to shoot movies and stills at the same time with some degree of compositional freedom.
World Volcano Tour – Leg 1, Hawai
Just my luck! I’m stuck in Hawai while the eruption of the decade is going on in Iceland. Contrary to Iceland there isn’t much going on in Hawai’i Volcanos National Park. There are no ocean lava flows at the moment, only minor surface flows in closed and difficult to reach areas. There is some activity around Pu’u ‘O’o and the new, 130m wide, vent in Halema’uma’u Crater.
Again in contrast to Iceland, areas where activity is taking place have limited public access or no access at all. One should bear in mind that Hawai is part of the US after all, where everything comes packaged with a warning and a disclaimer and perpetrators will be shot first and prosecuted afterwards. Only when you embrace this mindset will you be able to understand why the local guides and tour operators would rather take you to an inactive crater and show you pictures of how it looked like 20/30 years ago when it active rather than take you to an active crater, which needless to say will be closed to the public. The only free place is still the sea, there are basically no restrictions for approaching lava flows into the sea from the sea, provided that the flows are there i.e.
I’m happy to say Aloha to unremarkable Hawai tomorrow and Aloohhhaaaa to Yasur…Yes!
D700 Pop-Up Flash DIY Repair
The pop-up flash of my D700 stopped working, not that I use it that much.
Still, it has some use for Commanding other Nikon speedlights or as an emergency flash. So, I called Nikon Repair for a repair quote. They gave me a hefty 290Euro [±397 USD] estimate for the repair, which I find out of proportion.
Ok, there are a number of possible causes for the non-firing of the pop-up flash [faulty flash tube, wiring, electronic component(s) for e.g] but one of the most common is the lack of electric contact in the switch at the end-of-travel position of the pop-up flash.
So, I decided to take a closer look. If your camera is outside the warranty and you have some basic DIY skills then you might want to try the step-by-step instructions below before you handout the cash, especially if your hot-shoe is working fine.
It worked for me, saving some cash and inconvenience in the process so…here is: D700_PopUpFlash_DIY_Repair
The best Lowepro camera bag for airline carry-on?
I love Lowepro bags and I own several of them, but in Jan this year I had to return my Computrekker AW Plus for a small repair to one of the zip pockets inside. Sadly 2 months after! I was told by the distributor that the bag was discontinued and they didn’t have a replacement bag in stock neither the new bag [Pro Runner 450 AW] that is supposed to replace the Computrekker AW Plus. So I started looking at the new range trying to find out a suitable replacement for a carry-on bag.
Below is a comparison between the old and the new bags that are a close match to the maximum carry-on dimensions that most airlines use.
| Model | Interior Dim. | Exterior Dim. | Int. Capacity | Linear Ext. | Laptop Com. | |||||||
| Weight | Width | Height | Length | Width | Height | Length | (W+H+L) | Width | Height | Length | ||
| Computrekker AW Plus (disc) | 2.75 | 33 | 13.5 | 48 | 35.6 | 23.1 | 50.3 | 21384 | 109 | 29.5 | 4.75 | 47.5 |
| 6.06 | 13.0 | 5.3 | 18.9 | 14.0 | 9.1 | 19.8 | 1305 | 43 | 11.6 | 1.9 | 18.7 | |
| Computrekker AW (disc) | 1.54 | 28 | 12.5 | 38 | 34 | 21.6 | 45 | 13300 | 101 | 30.5 | 4 | 38 |
| 3.4 | 11.0 | 4.9 | 15.0 | 13.4 | 8.5 | 17.7 | 812 | 40 | 12.0 | 1.6 | 15.0 | |
| Omni Trekker (disc) | 2.45 | 33 | 13.5 | 44.5 | 34.5 | 16.5 | 45.5 | 19825 | 97 | no | ||
| 5.4 | 13.0 | 5.3 | 17.5 | 13.6 | 6.5 | 17.9 | 1210 | 38 | no | |||
| Pro Runner 450 AW | 2.7 | 31 | 17 | 47 | 34 | 29 | 50.5 | 24769 | 114 | 31 | 4.5 | 39.5 |
| 5.95 | 12.2 | 6.7 | 18.5 | 13.4 | 11.4 | 19.9 | 1511 | 45 | 12.2 | 1.8 | 15.6 | |
| Vertex 200 AW | 3.32 | 30 | 16.5 | 44 | 32 | 26 | 47 | 21780 | 105 | 30 | 5 | 42 |
| 7.32 | 11.8 | 6.5 | 17.3 | 12.6 | 10.2 | 18.5 | 1329 | 41 | 11.8 | 2.0 | 16.5 | |
| Vertex 300 AW | 3.7 | 31 | 16.5 | 52 | 33 | 26 | 55 | 26598 | 114 | 30 | 5 | 50 |
| 8.16 | 12.2 | 6.5 | 20.5 | 13.0 | 10.2 | 21.7 | 1623 | 45 | 11.8 | 2.0 | 19.7 | |
| Metric (cm,kg,cm3) | Note: Although the Omni Trekker does not have a laptop compartment you can still squeeze a 13” screen laptop in the harness compartment. | |||||||||||
| Imperial (in,lbs,in3) | ||||||||||||
The increase in height [from 23.1. to 29 cm] in the Pro Runner 450AW means that it is above most airlines limits, although in linear cm/in it does meet the maximum linear dimensions [see below]. The height issue also applies to the new Pro Trekkers 300 and 400 AW and this is why they were not included.
Both the Vertex 200 and 300 AW are good matches [height slightly above the limits, but I am sure they can be squeezed in]. The Vertex 300 AW also meets the maximum linear dimensions.
The now discontinued Computrekker AW Plus is nevertheless lighter than any of the Vertex bags and it is slightly wider which allows you to pack a Nikkor 200-400mm f/4 on the middle of the bag and still have space on both sides to pack the bodies and lenses, it is a tight fit but I have done it. The same packing will not be possible with the Vertex bags since they are 3cm/1.2in smaller in width, although the extra length of the Vertex 300 will compensate to some extent.
What the manufacturer does not tell you is that most mountaineering backpacks out there offer much better load distribution and comfort than any of these camera backpacks on medium/long treks. If this your case buy a backpack that provides easy access to the middle of the pack [like some rescue mountaineering backpacks] and fit a smaller camera bag inside the backpack if you want.
Of course there is still the question of the weight with the bag loaded [which will for sure exceed the maximum allowed in most airlines]. The following tips will also help for a trouble-free check-in:
- Wear the backpack casually on one shoulder. It gives the impression that is light and you are less likely to be asked to put it on the scale [this is also why I do not travel with roller bags for carry-on];
- Wear a photo vest under your jacket. If they ask you to weight your backpack you can always transfer a considerable part of the heavier stuff into your jacket and photo vest pockets, hopefully meeting the limit;
- If you still don’t meet the limit, kindly argue that you are carrying valuable, delicate equipment and point out that the European Directive [in Europe, obviously] foresees such exceptions;
- If the ignominious bastard still insists that you check the backpack, ask him if it is possible to hand it in at the gate [of course, get rid of any bag tag he might have put in between];
- If the above doesn’t do the trick and you are still being asked to check it in, as a last resort ask him to call the airline person responsible, get the names of both bastards [no, you can not kill them! It’s against the law, although it shouldn’t be] , take as much as possible of the valuable gear with you, file a written complain to the airline and take them to court if any of your checked gear gets damaged or disappears.
| Airline | Exterior Dim. | Linear Ext. | No. of pieces [Economy] | |||||
| Weight | Width | Height | Length | (W+H+L) | (basic or no Freq. Flyer card) | |||
| British Airways | Not Specified | 45 | 25 | 56 | 126 | 1 + Laptop or other small item | ||
| 17.7 | 9.8 | 22.0 | 50 | |||||
| United | Not Specified | 35 | 23 | 56 | 114 | 1 + Laptop or other small item | ||
| 13.8 | 9.1 | 22.0 | 45 | |||||
| KLM | 12 | 35 | 25 | 55 | 115 | 1 + Laptop or other small item | ||
| 26.46 | 13.8 | 9.8 | 21.7 | 45 | ||||
| Finnair | 8 | 45 | 25 | 56 | 126 | 1 + Laptop or other small item | ||
| 17.64 | 17.7 | 9.8 | 22.0 | 50 | ||||
| Singapore Air | 7 | 40 | 25 | 50 | 115 | 1 + Laptop or other small item | ||
| 15.43 | 15.7 | 9.8 | 19.7 | 45 | ||||
| Lufthansa | 8 | 40 | 20 | 55 | 115 | 1 carry-on | ||
| 17.64 | 15.7 | 7.9 | 21.7 | 45 | ||||
| Emirates | 7 | 38 | 20 | 55 | 113 | 1 carry-on | ||
| 15.43 | 15.0 | 7.9 | 21.7 | 44 | ||||
Note: The table above only applies for international flights from Europe.
In Conclusion:
- The Computrekker AW Plus [if you can still find one] as well as the Vertex bags are, as far as I am concerned, the best Lowepro options for carry-on if you are planning to take a reasonable amount of gear.
- Whenever possible opt for a friendly airline [like BA, United, KLM and others like them], one that is less likely to hassle you at check-in with carry-on and excess luggage charges.
PS: In the end I decided that my Computrekker AW Plus was still the best option for me, succeed in tracking a shop with one in stock, informed the Lowepro distributor and got it as a replacement.
![Lee Wraps [Left: New, Right: Old] Lee Wraps [Left: New, Right: Old]](https://jorgesantosphoto.files.wordpress.com/2012/09/lee-wraps1.jpg?w=715&h=207)
